Learn how to do pseudo planche push-ups with perfect form, avoid common mistakes, and discover the best variations to build real upper-body strength.
Pseudo planche push-ups are one of the most effective bodyweight exercises for developing powerful shoulders, a strong chest, and elite pushing strength. Whether you are training for calisthenics, military fitness, or athletic performance, mastering the pseudo planche push-up is essential.
What Is a Pseudo Planche Push-Up?
A pseudo planche push-up is an advanced bodyweight exercise in which you perform a push-up while leaning your body forward, placing more weight on your shoulders and upper chest.
The pseudo planche push-up is considered one of the best calisthenics exercises because it develops planche-specific strength while building muscle and body control.
Pseudo planche push-ups are commonly used in:
- Calisthenics training
- Strength and conditioning programs
- Gymnastics preparation
- Athletic performance routines
Unlike regular push-ups, pseudo planche push-ups significantly increase the load on the shoulders and require greater core stability.
Benefits of Pseudo Planche Push-Ups
Pseudo planche push-ups are one of the most powerful exercises for developing upper-body strength.
Benefits include:
- Builds powerful shoulders
- Strengthens the chest and triceps
- Develops planche-specific strength
- Improves core stability
- Enhances body control and balance
- Increases functional pushing power
Few bodyweight exercises challenge the upper body as effectively as the pseudo planche push-up.
Muscles Worked in Pseudo Planche Push-Ups
Pseudo planche push-ups activate several major muscle groups simultaneously.
Primary Muscles
- Anterior Deltoids
- Pectoralis Major
- Triceps Brachii
Secondary Muscles
- Serratus Anterior
- Upper Chest
- Core Muscles
- Obliques
- Wrist Flexors
Because of this muscle activation, pseudo planche push-ups are one of the best exercises for developing elite pressing strength.
How to Do a Pseudo Planche Push-Up (Step-by-Step)
Step 1: Set Up in a Push-Up Position
Begin with:
- Hands placed lower than the shoulders
- Feet shoulder-width apart
- Body in a straight line
- Core engaged
Tip: Turn your hands slightly outward if needed to reduce wrist discomfort.
Step 2: Lean Forward
Shift your body weight forward until your shoulders move in front of your hands.
Focus on:
- Maintaining a straight body
- Keeping your core tight
- Staying balanced
This forward lean is what makes the exercise unique.
Step 3: Lower Yourself Under Control
Bend your elbows and lower your chest toward the floor.
Focus on:
- Keeping your elbows close to your body
- Maintaining the forward lean
- Avoiding hip sag
Move slowly and under control.
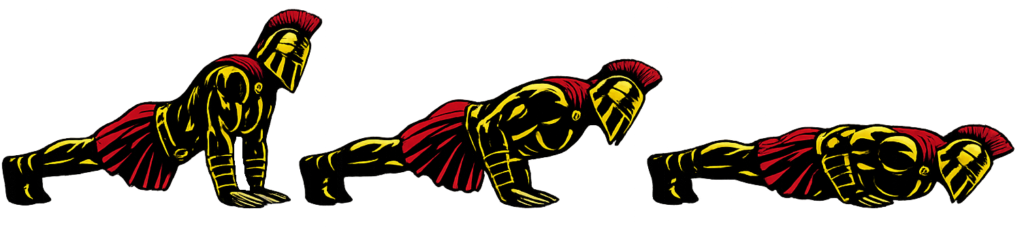
Step 4: Reach the Bottom Position
At the bottom:
- Chest is just above the floor
- Core remains tight
- Shoulders stay ahead of the hands
Pause briefly to maintain control.
Step 5: Push Back Up
Drive through your palms and return to the starting position.
Avoid losing the forward lean during the movement.
The pressing phase builds significant strength in the shoulders and chest.
Pseudo Planche Push-Up Form Checklist
Use this quick checklist to ensure perfect pseudo planche push-up form.
- Keep your body straight
- Maintain the forward lean
- Keep your core tight
- Control every repetition
- Use a full range of motion
Perfect form builds strength faster and prevents injury.
Common Pseudo Planche Push-Up Mistakes
Losing the Forward Lean
Problem: Turns the movement into a regular push-up.
Fix: Keep your shoulders ahead of your hands throughout the exercise.
Sagging the Hips
Problem: Reduces core activation and stresses the lower back.
Fix: Squeeze your glutes and maintain a rigid body position.
Flaring the Elbows
Problem: Places excessive stress on the shoulders.
Fix: Keep your elbows relatively close to your torso.
Using Momentum
Problem: Reduces muscle activation.
Fix: Perform every repetition slowly and under control.
Ignoring Wrist Position
Problem: Can lead to discomfort and poor leverage.
Fix: Turn your hands slightly outward and gradually increase the forward lean over time.
Clean reps always beat high numbers.
Pseudo Planche Push-Up Variations
Once you master the basic pseudo planche push-up, different variations can help build strength and increase difficulty.
Incline Pseudo Planche Push-Ups
A beginner-friendly variation.
How to Do Incline Pseudo Planche Push-Ups
- Place your hands on an elevated surface
- Lean forward slightly
- Perform the push-up under control
This variation reduces the amount of body weight being pressed.
Standard Push-Ups
An easier progression.
How to Do Standard Push-Ups
- Place your hands under your shoulders
- Lower your chest to the floor
- Push back up under control
This variation builds the foundation needed for pseudo planche push-ups.
Feet-Elevated Pseudo Planche Push-Ups
Increases shoulder loading.
How to Do Feet-Elevated Pseudo Planche Push-Ups
- Elevate your feet on a bench or box
- Maintain the forward lean
- Perform controlled repetitions
This variation develops greater pressing strength.
Planche Lean Holds
A planche-specific progression.
How to Do Planche Lean Holds
- Assume a push-up position
- Lean forward until the shoulders pass the hands
- Hold the position while maintaining full-body tension
This variation builds the shoulder strength required for advanced planche training.
Final Thoughts
The pseudo planche push-up is one of the most effective bodyweight exercises you can master.
It builds:
- Shoulder strength
- Chest strength
- Triceps strength
- Core stability
- Planche-specific power
Progress may feel slow at first because pseudo planche push-ups place a tremendous demand on the shoulders and core. However, with consistent training and proper form, your pushing strength and body control will steadily improve. Learn more about Push Workouts here.
One clean rep is always better than ten sloppy ones.
Focus on quality repetitions, full range of motion, and controlled movement.
A warrior develops mastery not by moving faster, but by controlling more.
Pseudo Planche Push-Up FAQ
Q1: Are pseudo planche push-ups harder than regular push-ups?
Yes. The forward lean shifts more weight onto the shoulders and upper chest, making the exercise significantly more challenging.
Q2: Do pseudo planche push-ups help with the planche?
Yes. They are one of the best exercises for developing planche-specific shoulder strength and body positioning.
Q3: How often should I train pseudo planche push-ups?
Most people can train pseudo planche push-ups 2–3 times per week, allowing enough time for recovery between sessions.